Bootstrapping CoreOS cluster with Kubernetes in 20 minutes using coreos-baremental and bootkube
Configuring bootcfg and dnsmasq for quick bootstrap of CoreOS cluster on baremetal servers. Install k8s using bootkube.
It’s 4 months now since I migrated my infrastructure to CoreOS and Kubernetes. Now I can say that this was the right decision. Or, even, the best thing that happened to my servers :).
Of course, there were some problems during this period, but mostly because of some misconfiguration from my side. Also, there was no single downtime because of infrastructure.
My original post was very long and compicated.
Actually, even I don’t want to reproduce all of this stuff ever again. That’s why, since I wrote that post and did all that steps,
I was thinking how to improve and automate that process. I wanted to have some service which will give you iPXE/TFTP/DHCP services out of the box.
And it should be possible to configure everything with just a few configs.
I liked the idea of Kelsey Hightower’s coreos-ipxe-server.
Which was not exactly what I wanted, but still much better that managing all this stuff manually.
I was thinking about using it for my next baremetal installation.
A few weeks ago I discovered bootkube project.
Bootkube is a helper tool for launching self-hosted Kubernetes clusters.
When launched, bootkube will act as a temporary Kubernetes control-plane (api-server, scheduler, controller-manager), which operates long enough to bootstrap a replacement self-hosted control-plane.
In other words bootkube will use temprorary kubernetes instance to deploy new cluster using kubernetes objects like deployments,pods,configmaps. And since all it’s components are k8s objects it will be able to scale/update/heal itself. And of course it will be much easier to upgrade cluster to new versions.
I found the idea of self-hosted Kubernetes very exciting. So exciting that I wanted to try it as soon as possible. Fortunately, about the same time I realized that I do not use even 1⁄10 of resources I have in my new home server. I was planning to deploy Kubernetes there to manage all containers anyways, so, it was a perfect match.
Since I didn’t want to do baremetal provisioning manually again, I spent weekend researching nicer ways of provisioning baremetal. And I found the great solution - coreos-baremetal, from CoreOS team itself. It’s built with all the pain points of provisioning baremetal servers using network boot in mind:
- it’s a single binary/container
- it can work as DHCP or DHCP-proxy server
- it can provide DNS
- it supports TFTP and iPXE boot
After you figured everything out it really takes about 20 minutes to bootstrap CoreOS cluster. But I found documentation a bit fragmented, so I decided to write this short step-by-step tutorial.
Prerequisites
I’m going to use 3 already created ESXi virtual machines to build CoreOS cluster.
I know mac addresses of this machines upfront.
I’m going to do all steps from VM #4 (Ubuntu based), but any other machine could be used,
even a laptop connected to the same network.
I’m going to use dns zone example.com and ip addresses 192.168.1.* in this tutorial.
Interget gateway is 192.168.1.254 and ubuntu-based VM is 192.168.1.250
Running dnsmasq as DHCP/DNS/iPXE server
Let’s start with dnsmasq. Dnsmasq is one of two services which form coreos-baremetal service. Dnsmasq is a daemon which provides you an easy way to run everything you need for a network boot.
dnsmasq provides an App Container Image (ACI) or Docker image for running DHCP, proxy DHCP, DNS, and/or TFTP with dnsmasq in a container/pod. Use it to test different network setups with clusters of network bootable machines.
The image bundles undionly.kpxe which chainloads PXE clients to iPXE and grub.efi (experimental) which chainloads UEFI architectures to GRUB2.
To run dnsmasq we need to write a config file first. Let’s create a new dnsmasq.conf
domain-needed
bogus-priv

domain=example.com
expand-hosts
local=/example.com/

listen-address=127.0.0.1
listen-address=192.168.1.250
bind-interfaces

dhcp-range=lan,192.168.1.1,192.168.1.100

# set default gateway
dhcp-option=lan,3,192.168.1.254

# set DNS server to this machine
dhcp-option=lan,6,192.168.1.250

dhcp-userclass=set:ipxe,iPXE

server=8.8.8.8

enable-tftp
tftp-root=/var/lib/tftpboot

pxe-service=tag:#ipxe,x86PC,"PXE chainload to iPXE",undionly.kpxe
pxe-service=tag:ipxe,x86PC,"iPXE",http://bootcfg.example.com:8080/boot.ipxe

# add resolving to the host
address=/bootcfg.example.com/192.168.1.250

# assign hostname and ip address to the nodes
dhcp-host=00:01:23:45:67:89,node1,192.168.1.21,infinite
dhcp-host=00:02:34:56:78:90,node1,192.168.1.22,infinite
dhcp-host=00:03:45:67:89:01,node1,192.168.1.23,infinite


log-queries
log-dhcp
domain-needed - never pass short names to the upstream DNS servers. If the name is not in the local /etc/hosts file then “not found” will be returned.
bogus-priv - reverse IP (192.168.x.x) lookups that are not found in /etc/hosts will be returned as “no such domain” and not forwarded to the upstream servers.
no-resolv - do not read resolv.conf to find the servers where to lookup dns.
no-poll - do not poll resolv.conf for changes
dhcp-range - range of IPs that DHCP will serve. proxy means that it will not give IP addresses, but only provide additional services.
enable-tftp - as it says, enable TFTP
tftp-root - location of tftp files that will be served
dhcp-userclass - assign tags based on client classes
pxe-service - configure pxe boot instructions
log-queries - logging
log-dhcp - logging
You can read more about configuration in dnsmasq-man
Now we need to configure our TFTP.
$ mkdir tftpboot
$ cd tftpboot
$ wget http://boot.ipxe.org/undionly.kpxe
$ cp undionly.kpxe undionly.kpxe.0
$ wget http://boot.salstar.sk/ipxe/ipxe.lkrn
$ mkdir pxelinux.cfg

$ cat > pxelinux.cfg/default <<EOF
timeout 10
default iPXE
LABEL iPXE
KERNEL ipxe.lkrn
APPEND dhcp && chain http://bootcfg.example.com:8080/boot.ipxe
EOF
Now, if we run a dnsmasq container with this config, we will have DHCP server for the network 192.168.1.*, with DNS, TFTP and instructions to forward iPXE clients to 192.168.1.250:8080 - IP of the machine running bootcfg, which we will configure next.
docker run -d \
    --cap-add=NET_ADMIN \
    --net=host \
    -v $PWD/tftpboot:/var/lib/tftpboot \
    -v $PWD/dnsmasq.conf:/etc/dnsmasq.conf \
    quay.io/coreos/dnsmasq -d -q
Configuring and running bootcfg for network provisioning
Now we need to run bootcfg.
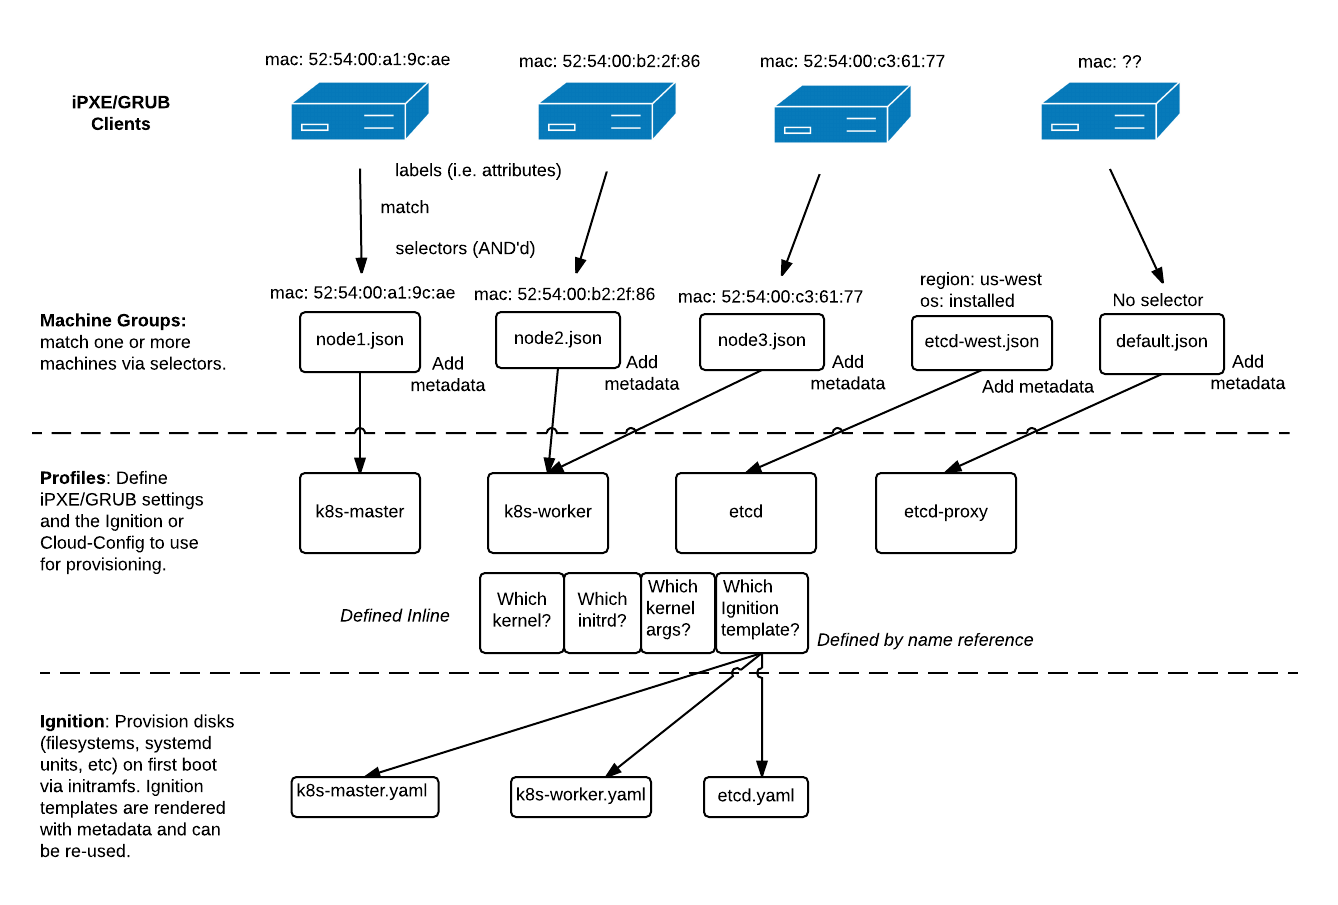
bootcfg is an HTTP and gRPC service that renders signed Ignition configs, cloud-configs, network boot configs, and metadata to machines to create CoreOS clusters. bootcfg maintains Group definitions which match machines to profiles based on labels (e.g. MAC address, UUID, stage, region). A Profile is a named set of config templates (e.g. iPXE, GRUB, Ignition config, Cloud-Config, generic configs). The aim is to use CoreOS Linux’s early-boot capabilities to provision CoreOS machines.
As said in the official description - it’s the service to actually provision servers with different configs based on metadata.
Lets clone coreos-baremetal repository. We will need only examples directory from it.
$ git clone https://github.com/coreos/coreos-baremetal
# Make a copy of example files
$ cp -R coreos-baremetal/examples .
# Download the CoreOS image assets referenced in the target profile.
$ ./coreos-baremetal/scripts/get-coreos alpha 1109.1.0 ./examples/assets
At this point, we need to decide on the roles we want our servers to have.
You can choose from available example groups inside the examples/groups or write your own.
> $ tree examples/groups
examples/groups
├── bootkube
├── bootkube-install
├── etcd
├── etcd-aws
├── etcd-install
├── grub
├── k8s
├── k8s-install
├── pxe
├── pxe-disk
└── torus
Before continuing, let’s try if everything works.
Run bootcfg container with -v $PWD/examples/groups/etcd:/var/lib/bootcfg/groups:Z \ to boot machines with etcd running.
$ docker run -p 8080:8080 -d \
    -v $PWD/examples:/var/lib/bootcfg:Z \
    -v $PWD/examples/groups/etcd:/var/lib/bootcfg/groups:Z \
    quay.io/coreos/bootcfg:v0.4.0 -address=0.0.0.0:8080 -log-level=debug
Reboot machines you’re going to provision. Machines should boot from PXE, get configuration from bootcfg and start CoreOS. Since we didn’t change anything in provision configs, default one should be served.
# examples/groups/etcd/default.json
{
  "id": "default",
  "name": "default",
  "profile": "etcd-proxy",
  "metadata": {
    "etcd_initial_cluster": "node1=http://node1.example.com:2380,node2=http://node2.example.com:2380,node3=http://node3.example.com:2380"
  }
}
It’s ok, but we want to have persistent Kubernetes cluster. So, let’s change some configs.
Files we’re going to use are located in examples/groups/bootkube-install
First of all lets replace some of the variables:
# We need to change all occurrences of `bootcfg.foo` to `bootcfg.example.com`
$ find examples/ -type f -print0 | xargs -0 sed -i -e 's/bootcfg.foo/bootcfg.example.com/g'

# Replace IP network from default to ours `192.168.1.*`
$ find examples/ -type f -print0 | xargs -0 sed -i -e 's/172.15.0./192.168.1./g'
And second, we need to add our ssh keys and corresponding MAC addresses to node1.json, node2.json, and node3.json.
Here is the content of node1.json file after changes we made so far with sed:
{
  "id": "node1",
  "name": "Master Node",
  "profile": "bootkube-master",
  "selector": {
    "mac": "52:54:00:a1:9c:ae",
    "os": "installed"
  },
  "metadata": {
    "ipv4_address": "192.168.1.21",
    "etcd_initial_cluster": "node1=http://192.168.1.21:2380,node2=http://192.168.1.22:2380,node3=http://192.168.1.23:2380",
    "etcd_name": "node1",
    "k8s_dns_service_ip": "10.3.0.10",
    "k8s_master_endpoint": "https://192.168.1.21:443",
    "k8s_pod_network": "10.2.0.0/16",
    "k8s_service_ip_range": "10.3.0.0/24",
    "k8s_etcd_endpoints": "http://192.168.1.21:2379,http://192.168.1.22:2379,http://192.168.1.23:2379",
    "networkd_address": "192.168.1.21/16",
    "networkd_dns": "192.168.1.250",
    "networkd_gateway": "192.168.1.254",
    "ssh_authorized_keys": [
      "ADD ME"
    ]
  }
}
We need to change mac address and check that DNS server and gateway is correctly set and add ssh public key. Do it for all 3 configs. Also you need to change etcd cluster info to use dns names instead of ip addresses:
"etcd_initial_cluster": "node1=http://node1.example.com:2380,node2=http://node2.example.com:2380,node3=http://node3.example.com:2380",
"k8s_etcd_endpoints": "http://node1.example.com:2379,http://node2.example.com:2379,http://node3.example.com:2379",
That’s basically it. Now stop any previously running bootcfg containers and start
the new one with examples/groups/bootkube-install as volume:
$ docker run -p 8080:8080 -d \
    -v $PWD/examples:/var/lib/bootcfg:Z \
    -v $PWD/examples/groups/bootkube-install:/var/lib/bootcfg/groups:Z \
    quay.io/coreos/bootcfg:v0.4.0 -address=0.0.0.0:8080 -log-level=debug
Now, when you restart your machines, they will boot basic CoreOS image and then install it on the disk.
It will take just a few minutes, and you can see progress on each machine with journalctl -f
After the installation, boxes will reboot and you will be able to ssh to it using your key.
At this stage, you have 3 machines with CoreOS installed on disk and hopefully healthy etcd cluster. You can check it from any node with:
core@localhost ~ $ etcdctl cluster-health
member 804d94c1234cb453 is healthy: got healthy result from http://192.168.1.21:2379
member a2f761234a47b2fb is healthy: got healthy result from http://192.168.1.23:2379
member e30ed10dc12349c9 is healthy: got healthy result from http://192.168.1.22:2379
cluster is healthy
Bootkube
Now we are ready to use bootkube to bootstrap temporary k8s control plane which will deploy our k8s cluster. Download the latest(v0.1.4) from github. Unzip it and run it with render argument.
bootkube render --asset-dir=assets --api-servers=https://192.168.1.21:443 --etcd-servers=http://192.168.1.21:2379 --api-server-alt-names=IP=192.168.1.21
You will get all needed manifests and SSL keys to deploy k8s.
# Now secure copy the kubeconfig to /etc/kuberentes/kubeconfig on every node
$ scp assets/auth/kubeconfig [email protected]:/home/core/kubeconfig
$ ssh [email protected]
$ sudo mv kubeconfig /etc/kubernetes/kubeconfig

# Secure copy the bootkube generated assets to any one of the master nodes.
$ scp -r assets [email protected]:/home/core/assets

# SSH to the chosen master node and bootstrap the cluster with bootkube-start
$ ssh [email protected]
$ sudo ./bootkube-start
In case you’ll get error saying that bootkube-start cannot be found, do:
$ cd /{YOUR_DOMAIN}/core/
$ sudo cp -R /home/core/assets .
$ sudo ./bootkube-start
That’s it. Sit and watch journalctl -f until you’ll see something like this:
I0425 12:38:23.746330   29538 status.go:87] Pod status kubelet: Running
I0425 12:38:23.746361   29538 status.go:87] Pod status kube-apiserver: Running
I0425 12:38:23.746370   29538 status.go:87] Pod status kube-scheduler: Running
I0425 12:38:23.746378   29538 status.go:87] Pod status kube-controller-manager: Running
Verify
This part is just copied from original readme
Install kubectl on your laptop. Use the generated kubeconfig to access the Kubernetes cluster. Verify that the cluster is accessible and that the kubelet, apiserver, scheduler, and controller-manager are running as pods.
$ kubectl --kubeconfig=assets/auth/kubeconfig get nodes
NAME          STATUS    AGE
192.168.1.21   Ready     3m
192.168.1.22   Ready     3m
192.168.1.23   Ready     3m

$ kubectl --kubeconfig=assets/auth/kubeconfig get pods --all-namespaces
kube-system   kube-api-checkpoint-192.168.1.21           1/1       Running   0          2m
kube-system   kube-apiserver-wq4mh                       2/2       Running   0          2m
kube-system   kube-controller-manager-2834499578-y9cnl   1/1       Running   0          2m
kube-system   kube-dns-v11-2259792283-5tpld              4/4       Running   0          2m
kube-system   kube-proxy-8zr1b                           1/1       Running   0          2m
kube-system   kube-proxy-i9cgw                           1/1       Running   0          2m
kube-system   kube-proxy-n6qg3                           1/1       Running   0          2m
kube-system   kube-scheduler-4136156790-v9892            1/1       Running   0          2m
kube-system   kubelet-9wilx                              1/1       Running   0          2m
kube-system   kubelet-a6mmj                              1/1       Running   0          2m
kube-system   kubelet-eomnb                              1/1       Running   0          2m
Try deleting pods to see that the cluster is resilient to failures and machine restarts (CoreOS auto-updates).
Links
- https://github.com/coreos/coreos-baremetal/blob/master/Documentation/bootkube.md
- http://www.thekelleys.org.uk/dnsmasq/docs/dnsmasq-man.html
- https://github.com/coreos/coreos-baremetal/tree/master/contrib/dnsmasq
- https://github.com/coreos/coreos-baremetal/blob/master/Documentation/bootkube.md
- https://www.linux.com/learn/dnsmasq-easy-lan-name-services

Share this post
Twitter
Google+
Facebook
Reddit
LinkedIn
StumbleUpon
Email